|
|
|
|
|
|
|
|
|
|
|
|
|
|
|
|
|
|
|
|
|
|
|
|
|
|
 |
| |
>
INTRODUCTION
a
fascination with imagination |
| |
>
THEME PARK MAGIC
inspirational rides and attractions |
| |
>
A PHANTOM PLOT UNFOLDS
a 2003 test from Disneyland ideas |
| |
>
THE HAUNTING BEGINS
five
years of Halloween, 2004-2008 |
|
>
BACK FROM THE GRAVE
2010-2011 with new technology |
| |
>
A 2013 RESURRECTION
a mix of new and age-old effects |
| |
>
DAWN OF THE UNDEAD
2014
show, part one |
| |
>
THE ZOMBIES EMERGE
2014 show, part two |
| |
>
A CHANGING CONCEPT
2015 show, part one |
| |
>
BUILDING PNEUMATIC FIGURES
2015 show, part two |
| |
>
ROLL UP, ROLL UP!
2015
show, part three |
| |
>
INTO THE TUNNEL...
2016
show, part one |
| |
>
MAKING MONSTERS MOVE
2016
show, part two |
| |
>
TO HELL AND BACK
2016 show, part three |
| |
>
SHARPENING THE
SENSES
2017 show, part one |
| |
>
A MAGNETIC ATTRACTION
2017 show, part two |
| |
>
THE BIG EXECUTION
2017 show, part three |
|
|
|
| |
Into the tunnel... |
|
|
|
|
|
|
|
|
|
|
|
|
|
|
|
|
|
|
|
|
|
|
|
|
|
|
|
| |
Turning the
Halloween Experience into a full-scale, enclosed walkthrough
has been my ultimate dream ever since I started
doing it, and in 2016, it happened!
The original idea actually goes back several years, where
we’d considered covering over the front of the display with
a big black sheet or curtain or similar, so that visitors
wouldn’t know what was coming until they entered the garden.
But this proved impractical as there was nowhere to hang
such a curtain, and also I’d been concerned that if we
covered it over in some way, it might actually prevent people from
noticing that it was even there!
Standing outside the 2015 display, Sam suggested to me “you
know what you should do?…you should cover over the path and
make a tunnel.” Hmm. Now there was an idea…
I gave this some thought, and it presented two main issues.
Firstly, the path was at the left-hand edge of the garden,
so the space for any effects on the left-hand side of the
tunnel would be severely restricted, and these would also be
visible to the arriving visitors, unless they were covered
over in some way. Secondly and more crucially, as the path
was in a straight line, it would be easy to see right
through the tunnel, all the way to the end, without going
in. Clearly, if visitors could see everything that was
coming up, there’d be little opportunity for shocks or
surprises - surely the whole point of having a tunnel?!
|
|
| |
 |
|
So I came up
with a new idea - what about snaking the tunnel around the
garden?
It would be an ambitious task, not least because it would
need to be built on a fairly undulating lawn, instead of
flat concrete. As well as this, there would be the need to
protect the lawn from loads of people walking around on it,
so it would need a floor of some kind. But it would also
offer several excellent advantages. |
|
|
|
|
|
|
|
|
|
|
|
|
|
|
|
|
|
|
|
|
|
|
|
|
|
| |
The fact that it
would follow a big U shape right around the garden meant
that the effective length of the tunnel would be increased
to over twice that of the path, allowing for a much bigger
and better show! Not only that, but its shape would mean
that visitors would now have corners to negotiate, with no
idea what was coming up. In fact, only the very first
section would be visible from the entrance. Finally it would
become a real journey into the unknown! |
|
|
 |
|
|
|
|
|
|
|
|
|
|
|
|
|
|
|
|
|
|
|
|
|
|
|
|
|
|
| |
With this
layout, the tunnel would release its victims back onto the
path near the house, meaning that visitors yet to go through
would see these people in a (hopefully!) animated and
excited state, having just been subjected to the horrors
inside. With a well designed show, these exiting
visitors would be my best advert for encouraging others to
go in.
Of course, if I
was to go ahead with the tunnel idea, it would add a lot of
extra work to the whole process. Up until now, I’d already
had a very nice, ready-made garden in which to install
everything. The whole project was based around creating
effects to put into an already-existing environment. Now,
the environment that would house the display also needed to
be created; a show building, if you will! The effects and figures would still do the
entertaining, and hopefully the tunnel itself would heighten
the atmosphere, but I now needed to design a way of getting
the visitors through the show too. |
|
| |
|
|
|
|
|
|
|
|
|
|
|
|
|
|
|
|
|
|
|
|
|
|
|
|
|
|
|
|
| |
Design and construction begins... |
|
|
|
|
|
|
|
|
|
|
|
|
|
|
|
|
|
|
|
|
|
|
|
|
|
|
|
|
|
|
| |
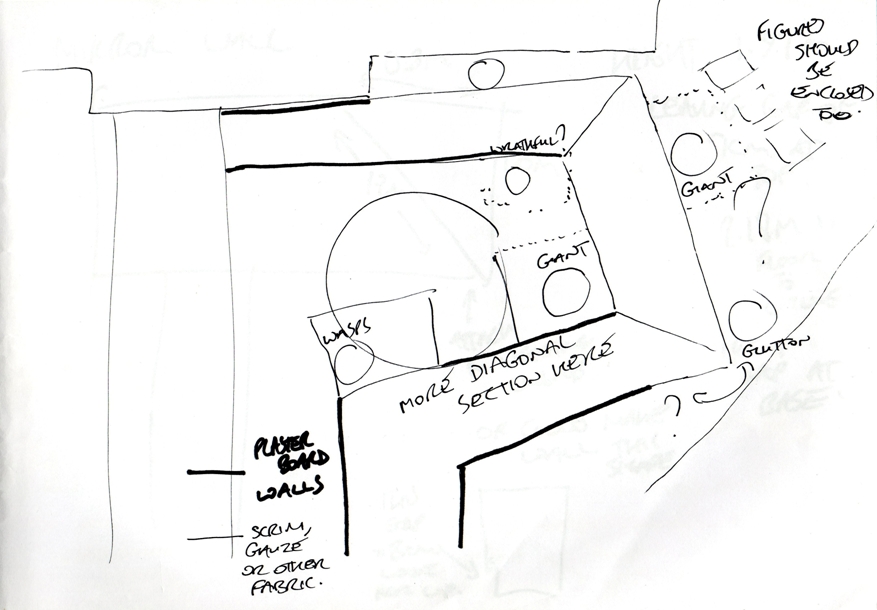
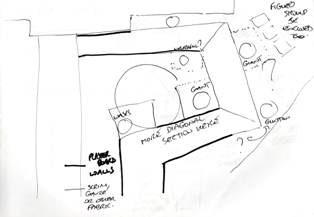
The tunnel
design went through quite significant changes in terms of
what materials I thought best to build it from. The first
idea I had was to create a sort of polytunnel-type job, a
bit like a tent, with fabric stretching from the floor at
one side, up over curved pipes to form a roof, and down to
the floor on the other side. But the fact it would look like
a tent was a bit off-putting; I fancied something a bit more
grand and imposing. (The Tent of Hell doesn’t sound terribly
scary either does it?!)
I had also imagined the whole thing having ‘windows’ in the
walls through which visitors could see different scenes.
These scenes would need to be located outside of the
walkthrough space, in their own enclosed sections. What the
tunnel needed was a series of sturdy walls to divide the
scene areas from the walkthrough route. In the end, a wooden
construction seemed the best choice.
|
|
| |
 |
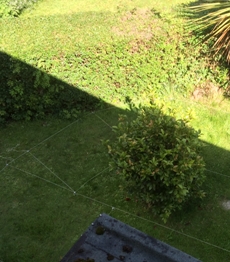 |
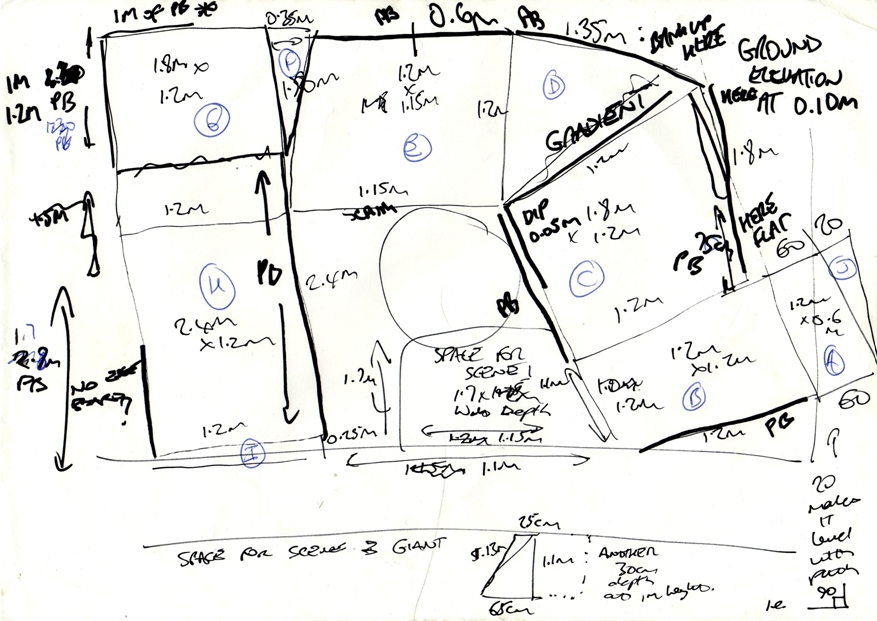
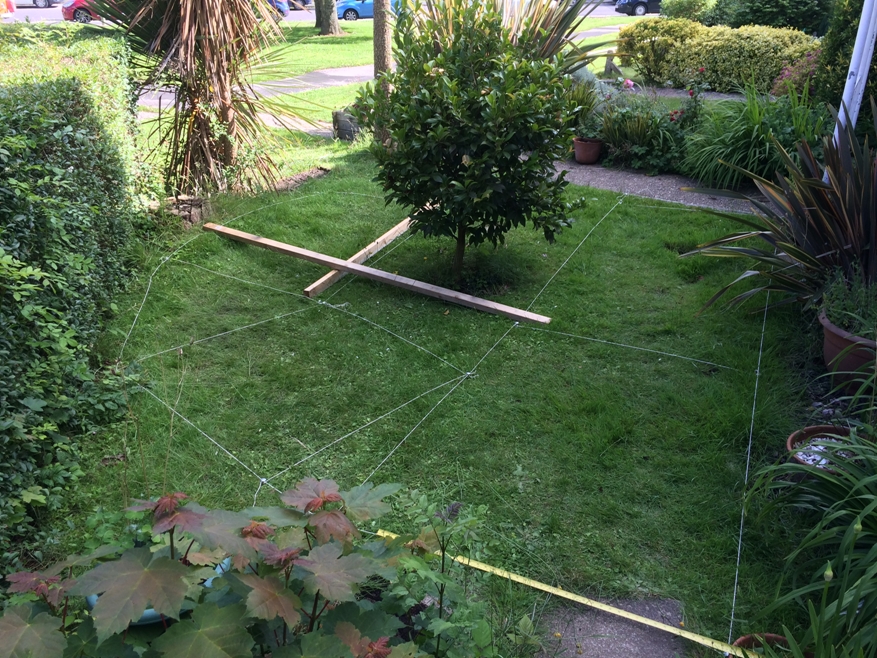
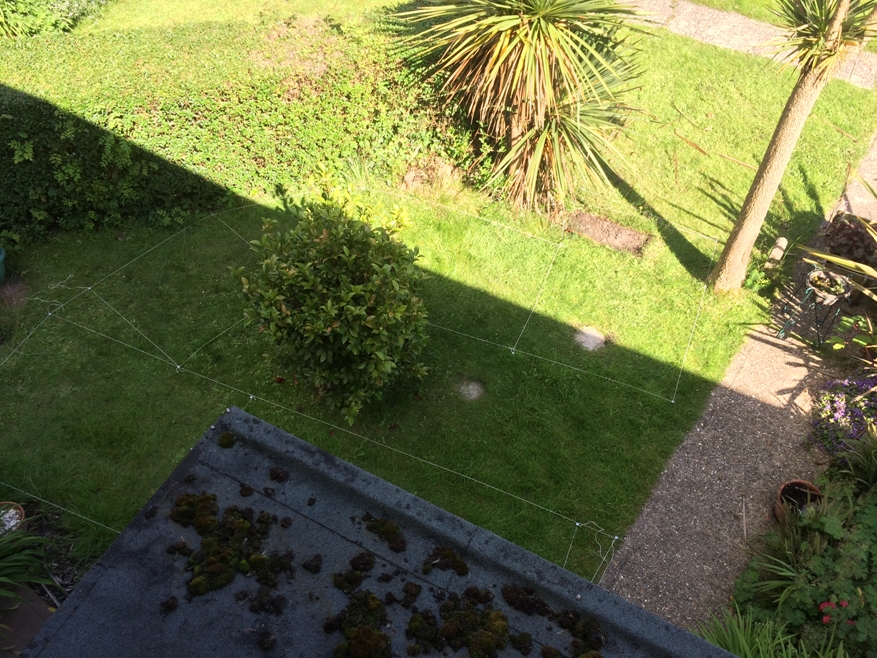
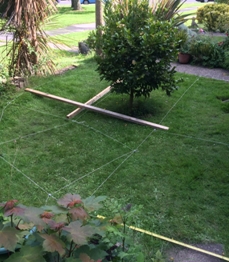
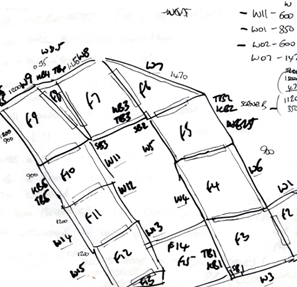
In order to work
out the dimensions of the tunnel, I used string to mark out
the proposed footprint on the lawn itself. This would help
me to create pieces of floor to the exact dimensions and
shapes required.
This took quite
a bit of shuffling about, as it was important to me that not
only was the width of the tunnel made wide enough to not
feel small, but it was also necessary to ensure that there
was enough space at appropriate points either side of the
tunnel to be able to fit the planned scenes. Not easy when
you’ve got a big camellia bush in the middle of the garden,
and hedges and walls surrounding it!
|
|
|
|
|
|
|
|
|
|
|
|
|
|
|
|
|
|
|
|
|
|
|
|
|
|
|
|
|
|
|
| |
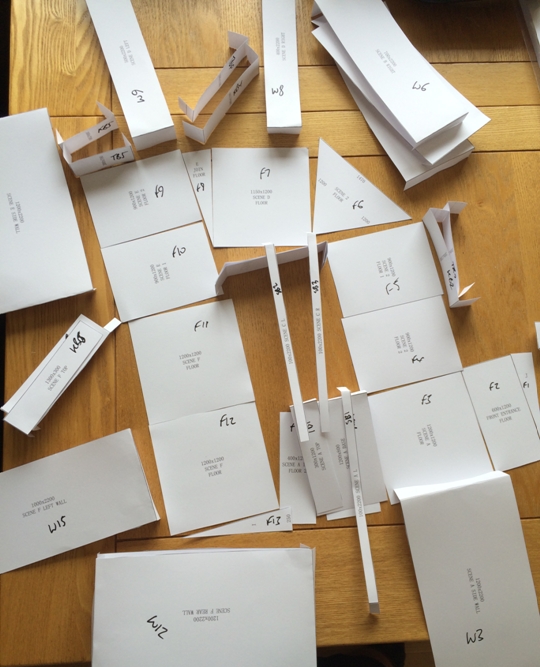
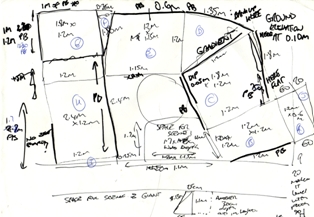
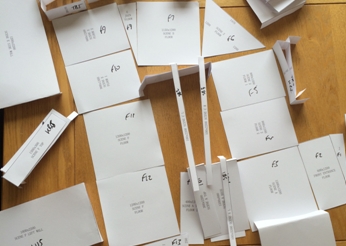
Once I had the
dimensions of the pathway sorted, I was able to create a
scale model out of card that I used to work out the sizes of
each of the wall pieces needed. I decided that the walls
would have a height of 2.2m. Plenty high enough, even for me
at 6ft 4”, and I figured that if I could walk through it
without cracking my head on all the lights, everyone else
should be fine!
With help from the little card model, I built up a complete
list of pieces, and created a cutting list which I took to a
local timber merchant,
Totton Timber, who
had the big task of cutting it all out for me. They did a
top job, and a couple of weeks later half a ton of wood arrived
on the back of a lorry, with Nigel the delivery driver immediately
asking me what on earth I was planning to make out of it
all! Fortunately, I’m used to looking a bit weird in these
sorts of situations… |
|
 |
|
|
|
|
|
|
|
|
|
|
|
|
|
|
|
|
|
|
|
|
|
|
|
|
|
|
|
|
|
|
|
|
|
|
|
|
|
|
|
|
|
|
|
|
|
|
| |
 |
|
|
|
|
|
|
|
|
|
|
|
|
|
|
|
|
|
|
|
|
|
|
|
|
|
|
|
|
|
|
| |
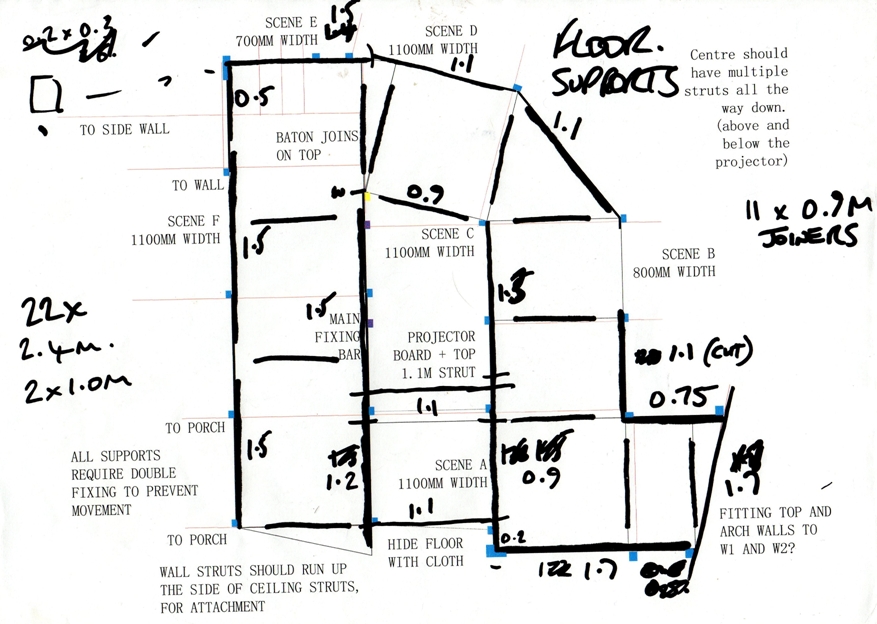
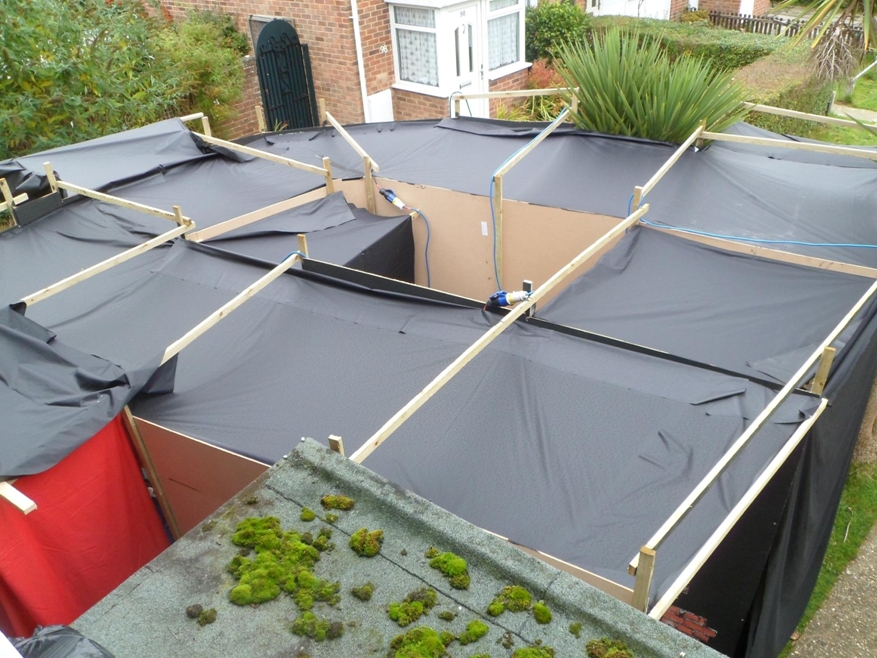
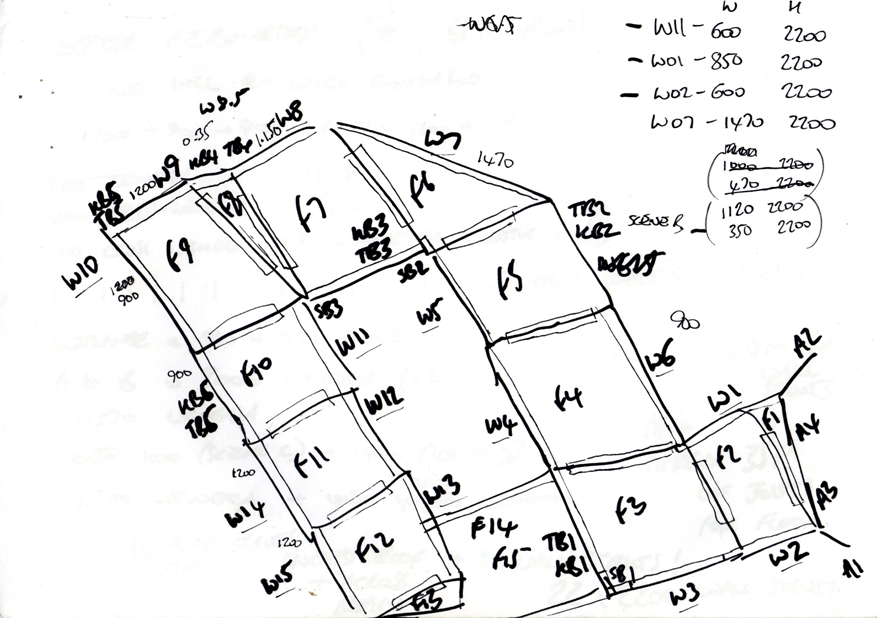
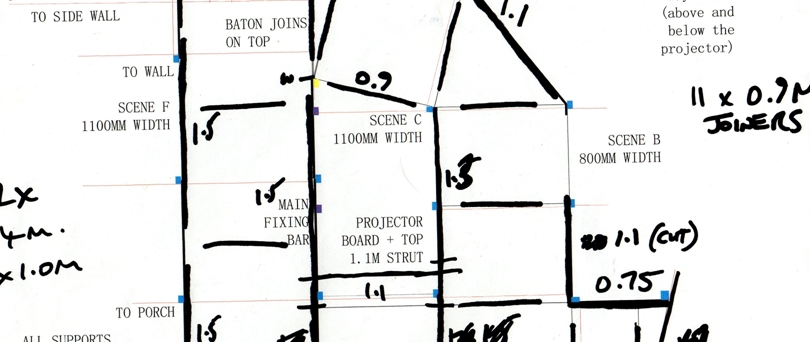
The tunnel,
having now become a fully wooden design, had a 15mm thick
MDF floor that sat on pressure-treated battens which raised
it approximately 50mm from the ground. This protected the
lawn underneath from being trampled, and allowed for a flat
surface to walk over. This also made it simple for the
sections of wall (sheets of 6mm MDF) to be screwed in at the
base and secured. Struts fitted between each wall panel to
fix them together, and then protruded above wall height,
allowing more struts to run across the top of the tunnel and
hold these in place, rather like a 3D grid layout. Click the
image above to see the full plan.
It’s worth acknowledging at this point that of course MDF is
quite unsuitable for use in permanent outdoor construction,
in part due to its propensity to warp in damp
environments...but as you’ll see later, it was only outside
for a few days, it was covered over, and it was relatively
cheap, so I used it!
|
|
|
|
|
|
|
|
|
|
|
|
|
|
|
|
|
|
|
|
|
|
|
|
|
|
|
|
|
|
|
| |
The tunnel test build |
|
|
|
|
|
|
|
|
|
|
|
|
|
|
|
|
|
|
|
|
|
|
|
|
|
|
|
|
|
|
|
| |
 |
|
 |
|
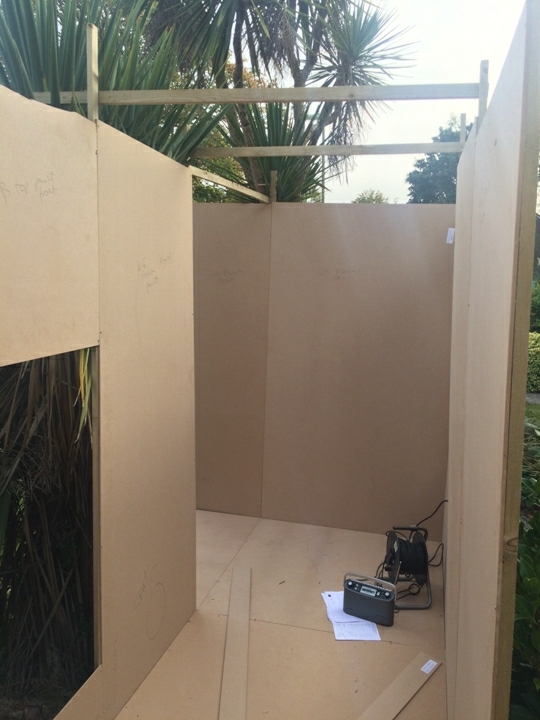
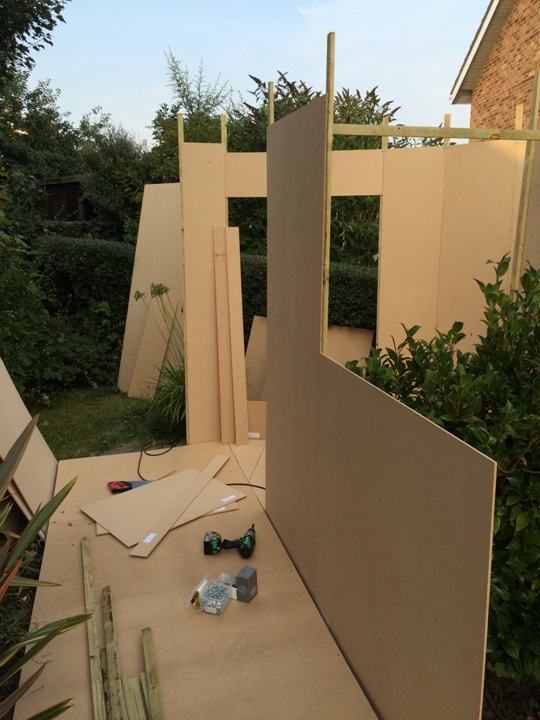
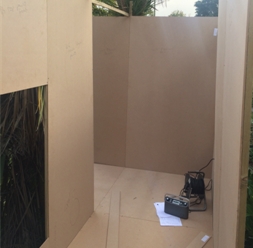
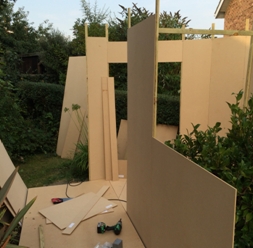
To make sure I’d
got all the dimensions of the tunnel pieces right, it was
time for a test build. In September, I had a go at slotting
together what I would describe as the most difficult
sections of it! As the tunnel got nearer the house, the
assembly became more straightforward, as the majority of the
scene windows were in its first two thirds.
But this all looked promising - only a few tweaks and extra
bits were required, and it also proved that the wooden floor
would fit securely on the uneven ground beneath it. It was
quite exciting seeing the tunnel (or at least parts of it!)
in place for the first time! |
|
|
|
|
|
|
|
|
|
|
|
|
|
|
|
|
|
|
|
|
|
|
|
|
|
|
|
|
|
|
| |
 |
See the tunnel at the testing stage
with this short clip recorded from the perspective of
walking through it
(.mp4,
7.0mb) |
|
|
|
|
|
|
|
|
|
|
|
|
|
|
|
|
|
|
|
|
|
|
|
|
|
|
|
|
|
|
|
|
|
| |
The next stage
was to take it all away again and paint it. This was quite a
long process as there were lots of sections. I had
considered leaving the floor unpainted, to make it lighter
and easier to see the route ahead, but I gave in eventually,
thinking that a black floor would blend in a lot better! So
this meant yet more painting, this time with a heavy-duty
floor paint that wouldn’t come off on everyone’s shoes!
It
did however form a nice shield from damp and dirt, and kept
the floor in good condition. |
|
|
|
|
|
|
|
|
|
|
|
|
|
|
|
|
|
|
|
|
|
|
|
|
|
|
|
|
|
|
| |
 |
|
|
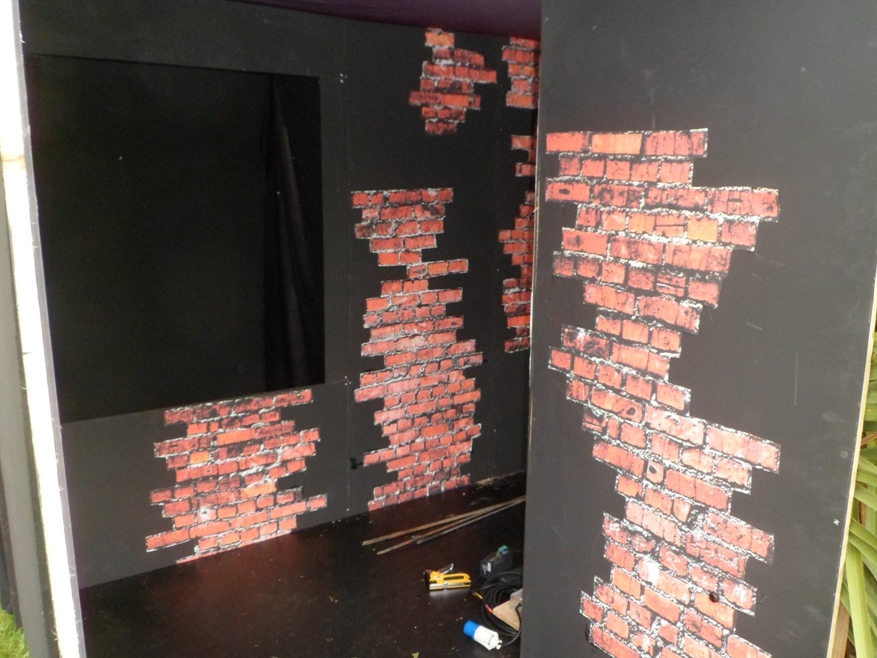
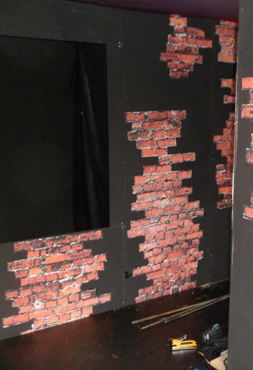
< I wanted the
walls to have some brickwork detail to them, to give a sort
of dungeon feel. Originally I planned to use brick slips,
which are imitation brick faces that are used in
interior design and other applications. But it quite quickly
became apparent that these would not only cost a fortune for
the amount I needed, but also they had to be stuck on one by
one! It would take forever! So I eventually found some great
brick effect vinyl, which was cut out and glued onto the
black painted walls.
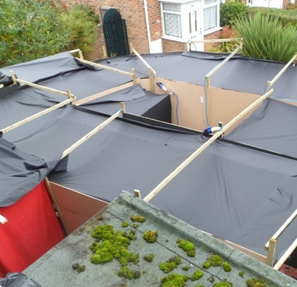
> For the roof, I had originally considered using more wood,
effectively made from identically sized pieces to the floor.
But this added significant cost, so I decided to use a black
waterproof nylon fabric instead, stretched across the roof
space and stapled into the tops of the walls. This was
perfectly adequate and did a good job of protecting the
interior from moisture. At night, this roof vanished into
the darkness too, so it mattered little what it looked like
during the day. |
|
 |
|
|
|
|
|
|
|
|
|
|
|
|
|
|
|
|
|
|
|
|
|
|
|
|
|
|
|
|
|
|
|
|
|
|
|
|
|
|
|
|
|
|
|
|
|
|
|
|
| |
Putting it all together! |
|
|
|
|
|
|
|
|
|
|
|
|
|
|
|
|
|
|
|
|
|
|
|
|
|
|
|
|
|
|
|
|
| |
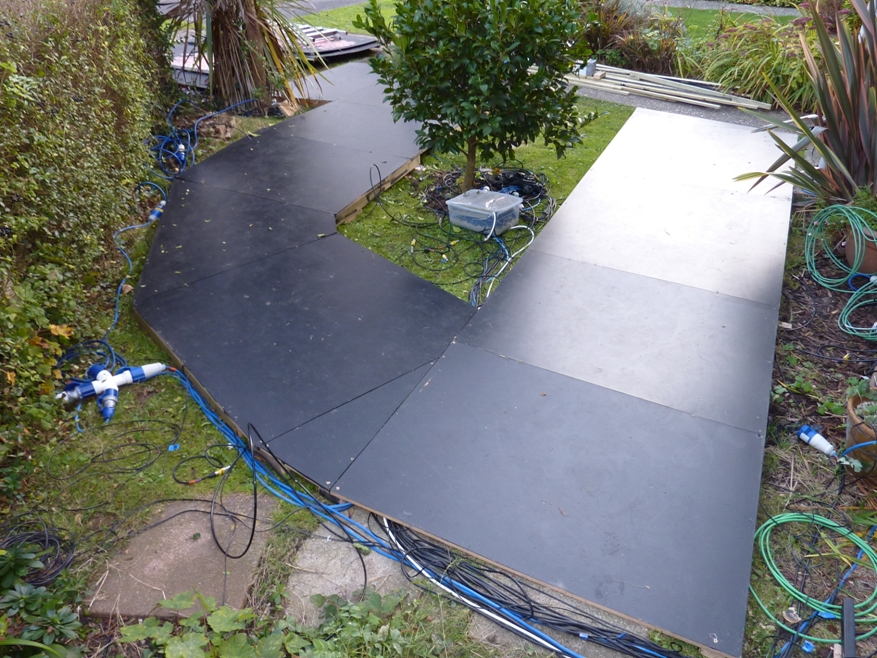
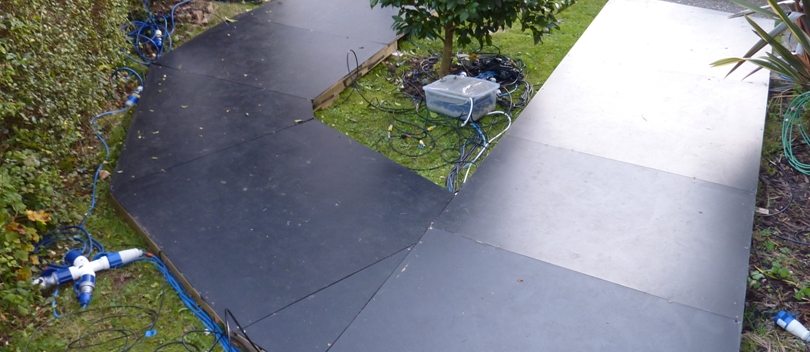
In the last week
of October, it was time to build the tunnel for real! The
floor was first to go down, this time with its shiny new
paint job. The photo below gives a good idea as to how the
tunnel snaked around the garden. Directly before this, the
air pipe for the pneumatic figures, plus all the necessary
cables, for things such as power, lighting, speakers and
motion sensors were laid down, then the floor was built over
these. |
|
|
|
|
|
|
|
|
|
|
|
|
|
|
|
|
|
|
|
|
|
|
|
|
|
|
|
|
|
|
| |
|
|
|
|
|
|
|
|
|
|
|
|
|
|
|
|
|
|
|
|
|
|
|
|
|
|
|
|
|
|
|
| |
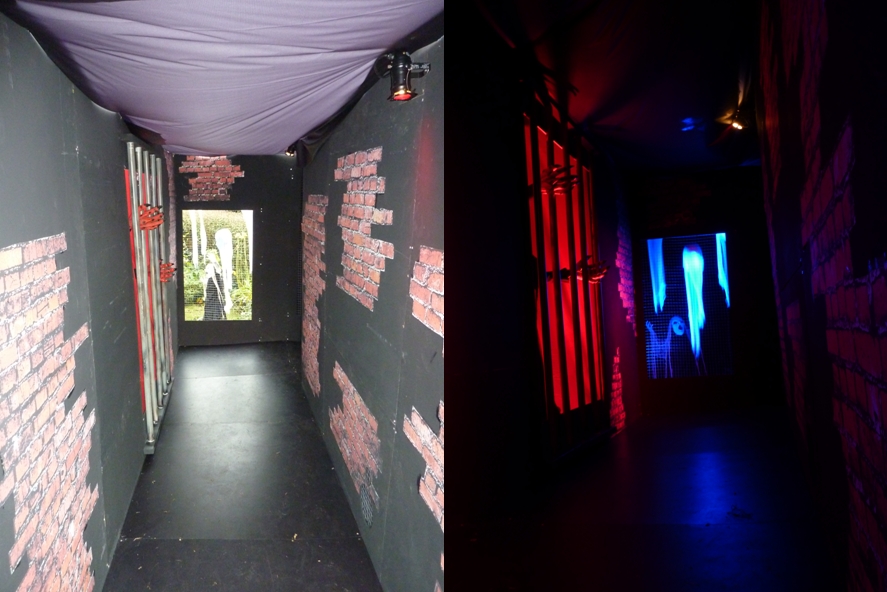
 |
|
Gradually the
walls were added, and attached together with the overhead
struts. Holes were cut into the bases of the walls to allow
for speakers to be positioned just outside. For the scene
windows, I used a mix of materials to cover them.
Most had
one-inch wire mesh, but two of them used bars recycled from
the cages of the 2015 display! As was necessary for the
effect, the first scene window was also covered with scrim
material behind the bars. |
|
 |
|
|
|
|
|
|
|
|
|
|
|
|
|
|
|
|
|
|
|
| |
Battens extending outwards above each scene allowed for
black drapes to be stapled in place to create little
curtained-off areas that the figures could be housed in,
preventing external light from bleeding in and lessening the
effects.
The little area in the centre of the tunnel (under the bush
in the big floor picture above!) was to be a
useful space to localise power and also store the valves for
the pneumatics. More about that on the next page.
The stage was set. Now it was time to add the cast for 2016! |
|
| |
 |
|
|
|
|
|
|
|
|
|
|
|
|
|
|
|
|
|
|
|
|
|
|
 |
|
|
|
|
|
|
|
|
|
|
|
|
|
|
|
|
|
|
|
|
|
|
|
|
|
|
|
|
|
|
|
|