|
|
|
|
|
|
|
|
|
|
|
|
|
|
|
|
|
|
|
|
|
|
|
|
|
|
|
|
|
|
|
|
|
|
|
|
|
|
|
|
|
|
|
|
|
 |
| |
>
INTRODUCTION
a
fascination with imagination |
| |
>
THEME PARK MAGIC
inspirational rides and attractions |
| |
>
A PHANTOM PLOT UNFOLDS
a 2003 test from Disneyland ideas |
| |
>
THE HAUNTING BEGINS
five
years of Halloween, 2004-2008 |
|
>
BACK FROM THE GRAVE
2010-2011 with new technology |
| |
>
A 2013 RESURRECTION
a mix of new and age-old effects |
| |
>
DAWN OF THE UNDEAD
2014
show, part one |
| |
>
THE ZOMBIES EMERGE
2014 show, part two |
| |
>
A CHANGING CONCEPT
2015 show, part one |
| |
>
BUILDING PNEUMATIC FIGURES
2015 show, part two |
| |
>
ROLL UP, ROLL UP!
2015
show, part three |
| |
>
INTO THE TUNNEL...
2016
show, part one |
| |
>
MAKING MONSTERS MOVE
2016
show, part two |
| |
>
TO HELL AND BACK
2016 show, part three |
| |
>
SHARPENING THE
SENSES
2017 show, part one |
| |
>
A MAGNETIC ATTRACTION
2017 show, part two |
| |
>
THE BIG EXECUTION
2017 show, part three |
|
|
|
| |
|
The undead rises on
October 31st 2014! |
|
|
|
|
|
|
|
|
|
|
|
|
|
|
|
|
|
|
|
|
|
|
|
|
|
|
|
|
|
|
|
|
|
|
|
|
|
|
|
|
|
|
|
|
|
|
|
|
|
|
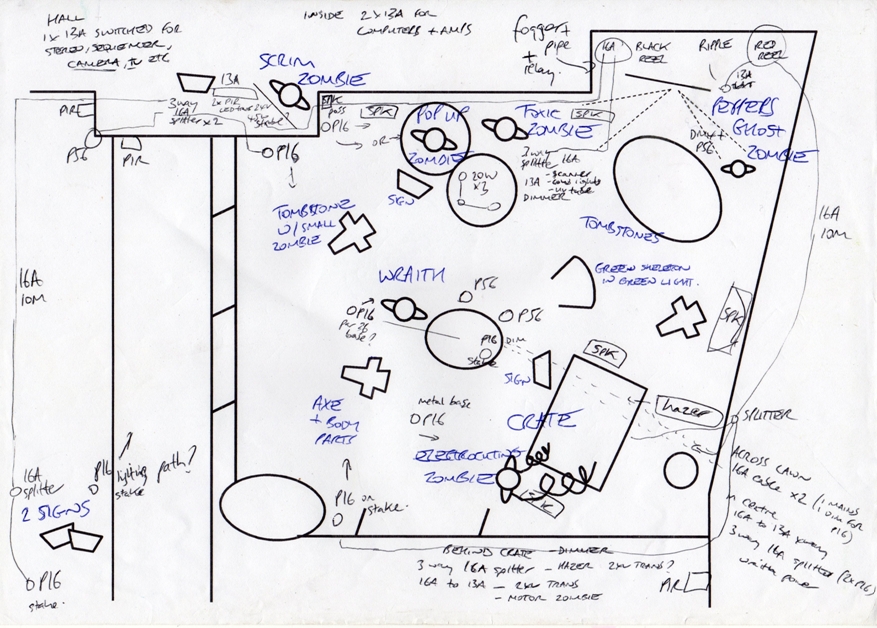
The diagram to
the right shows the layout of the zombie display. While it has
some basic similarities to 2013, there were new scenes and effects
that I created, including the
electrocution in the crate, the barrels of toxic waste, and
a hooded ‘wraith’ figure that was to turn and face visitors
as they approached!
In total, the garden was presided over by ten figures,
including a host of zombies that were on hand to make lots
of visitors jump!
Let’s look at some of the effects in more detail. |
|
|
|
|
|
|
|
|
|
|
|
|
|
|
|
|
|
|
|
|
|
|
|
|
|
|
|
|
|
|
|
|
| |
|
|
|
 |
|
|
| |
|
|
|
|
|
|
|
|
|
|
|
|
|
|
|
|
|
|
|
|
|
|
|
|
|
|
|
|
|
|
|
|
|
|
|
|
|
|
|
|
|
|
|
|
|
|
|
|
|
|
|
|
|
|
|
|
|
|
|
|
|
|
|
|
|
|
|
|
|
|
|
|
|
|
|
|
|
| |
|
|
The Crate |
|
|
|
|
|
|
|
|
|
|
|
|
|
|
|
|
|
|
|
|
|
|
|
|
|
|
|
|
|
|
|
|
|
|
|
|
|
|
|
|
|
|
|
|
|
|
|
|
| |
|
|
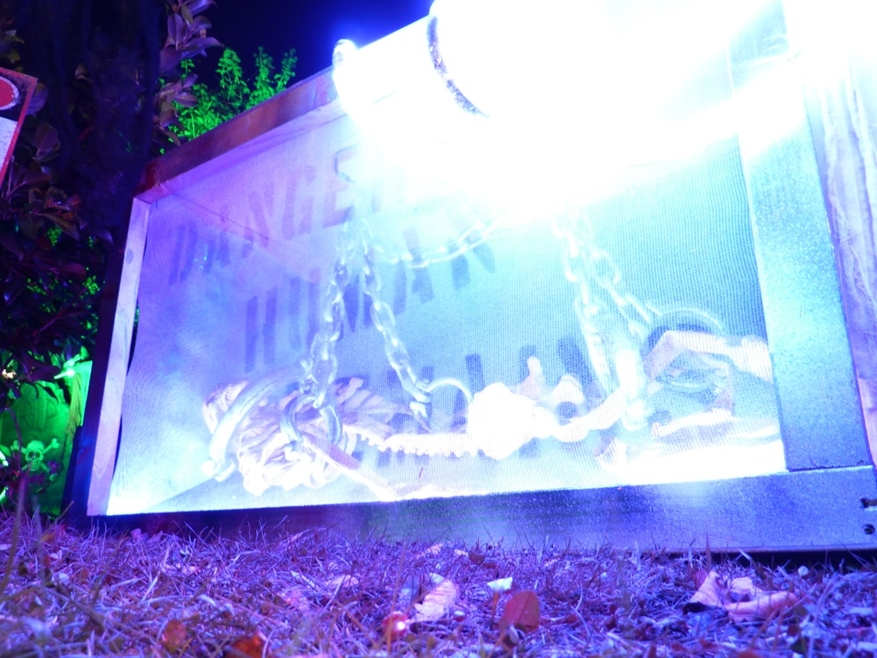
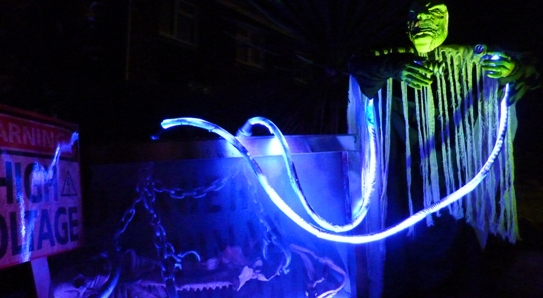
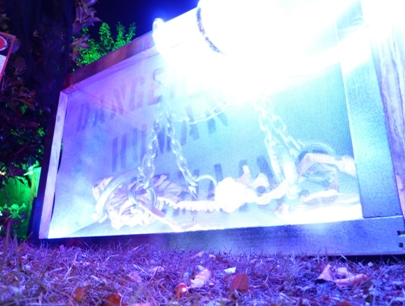
Visitors were first confronted
with a zombie holding glowing electrodes on cables attached
to a giant wooden crate, marked ‘DANGER HUMAN REMAINS’. As
they moved nearer, the zombie turned its head to face
them with a ghoulish laugh. Buzzing sounds were
heard as the electric cables glowed more brightly.
Suddenly, the front of the crate became transparent, and
visitors saw a skeleton, bound in chains, being
electrocuted, amid loud zapping noises and his anguished
screams! |
|
| |
|
 |
|
|
|
|
|
|
|
|
|
|
|
|
|
|
|
|
|
|
|
|
|
|
|
|
|
|
|
|
|
|
|
|
|
|
|
|
|
|
|
|
|
|
|
|
|
|
|
|
|
| |
|
|
I had originally
intended to find a suitable wooden crate that I could adapt.
But it turns out that wooden crates cost a lot more than I
thought! I soon discovered that the most abundantly
available crates were impressively enormous structures that looked as though they could
withstand nuclear blasts. While I was looking for something
reasonably big, the quality of build was rather unimportant – I
was only going to chop holes in it anyway. So in the end I
gave up the search, bought a load of wood and built
one myself!
|
|
|
|
|
|
|
|
|
|
|
|
|
|
|
|
|
|
|
|
|
|
|
|
|
|
|
|
|
|
|
|
|
|
|
|
|
|
|
|
|
|
|
|
|
|
|
|
|
|
|
|
|
|
|
| |
|
|
|
 |
|
|
|
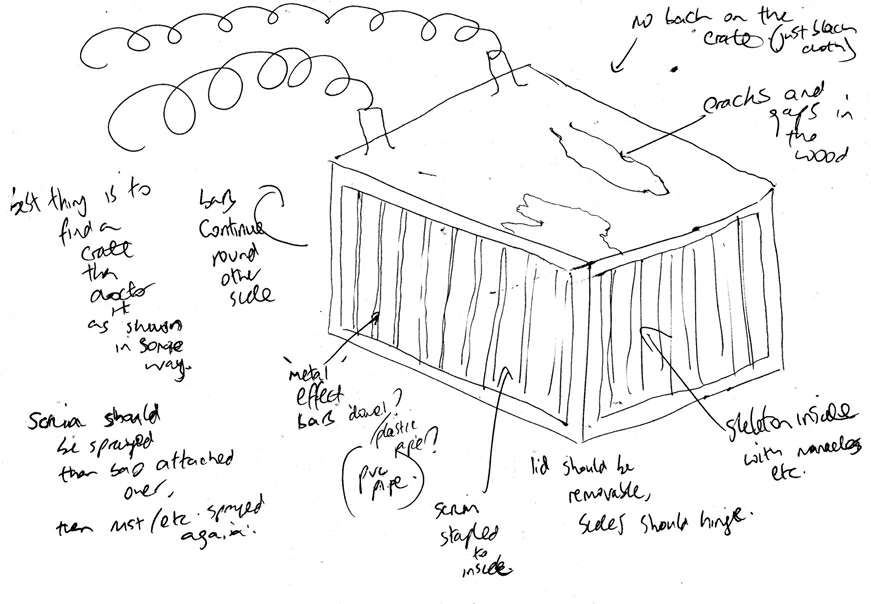
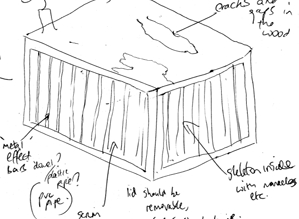
I had initially
imagined the crate looking metallic; the highly artistic
drawing to the left (!) shows it with 'metal' bars, giving
a more cage-like appearance. For simplicity the bars were
scrapped, but the wooden frame was sprayed black and silver
to give a more imposing look. Sheets of MDF were added to
create the top and the base on which the skeleton sat
inside.
The idea for the sides of the crate turning transparent came
from the 2013 display, where a skeleton (the same one as in
this new effect!) suddenly appeared from behind a sheet in
the porch, giving a great shock effect. Both this and the
new crate effect would rely on a piece of scrim fabric to
operate (as used prolifically in the attractions of
Disneyland Paris, Blackgang Chine and other theme parks).
|
|
|
|
|
|
|
|
|
|
|
|
|
|
|
|
|
|
|
|
|
|
|
|
|
|
|
|
|
|
|
|
|
|
|
|
|
|
|
|
|
|
|
|
|
|
|
|
|
|
|
|
|
|
|
|
|
|
|
|
|
|
|
|
|
|
|
|
|
|
|
|
|
|
|
|
|
|
|
|
|
|
|
|
|
|
|
|
|
|
|
|
|
|
|
|
|
|
|
| |
|
|
 |
|
|
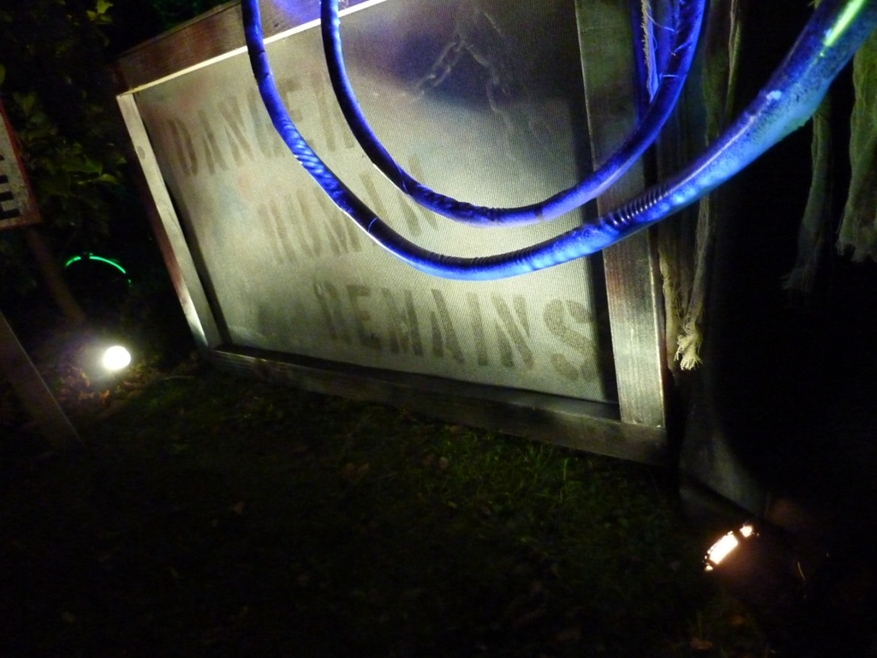
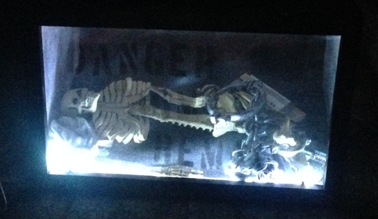
The material I
used in 2013 was quite thick, and as such did not allow the
skeleton to be as visible as I wanted. So I got hold of some
professional theatrical ‘shark-tooth’ scrim and stapled this to the inside of the crate, completing the
sides.
This top quality stuff had excellent transparency, but when lit from
the front, appeared opaque – this really enhanced the
surprise element of the effect, hiding the skeleton from
view before it was revealed amid the bright electrical
flashes! It had the added bonus of being able to be painted,
so ‘DANGER HUMAN REMAINS’ was cut out of card and stencilled
with spray paint onto the front of the scrim. |
|
|
| |
|
|
|
|
|
|
|
|
|
|
|
|
|
|
|
|
|
|
|
|
|
|
|
|
|
|
|
|
|
|
|
|
|
|
|
|
|
|
|
|
|
|
|
|
|
|
|
|
|
|
|
|
| |
|
The electrode
conundrum |
|
|
|
|
|
|
|
|
|
|
|
|
|
|
|
|
|
|
|
|
|
|
|
|
|
|
|
|
|
|
|
|
|
|
|
|
|
|
|
|
|
|
|
|
|
|
|
|
|
|
|
|
|
|
|
| |
|
|
The biggest
challenge I had whilst building this prop was the
big ‘cables’ attached to the crate and held by the zombie. I
wanted them to appear as translucent ‘tubes’, about 2cm
thick, that glowed uniformly and could dim and brighten in
sync with electrical buzzing sounds. Initially I had
considered using rope light – easily dimmable, and the
electric blue colour could be easily achieved using some
coloured gel. The problem was – how could this be installed
so the ‘cables’ gave off a soft, diffused light?
|
|
|
|
|
|
|
|
|
|
|
|
|
|
|
|
|
|
|
|
|
|
|
|
|
|
|
|
|
|
|
|
|
|
|
|
|
|
|
|
|
|
|
|
|
|
|
|
|
|
|
|
|
|
|
|
|
|
|
|
|
|
|
|
|
|
|
|
|
|
|
|
|
|
|
|
|
|
|
|
|
|
|
|
|
|
|
|
|
|
 |
|
|
| |
|
|
Rope light was
later found to be unsuitable after my idea to coat it with
frosting spray did not work – the individual LEDs in the
tube could still be seen. I then tried another method;
electro-luminescent wire, or EL wire. This is a thin piece
of phosphor-coated copper which glows when powered. But
after ordering some test pieces, I found that not only was
it much dimmer than I'd expected, but due to the high
frequency of the drivers, it also made a high-pitched buzzing
sound that very easily transferred to nearby sound
equipment! Clearly this was not suitable either!
The solution I chose was to use LED tape; in this case,
adhesive strips of RGB LEDs that can be colour mixed and
dimmed. I went for really bright, 4000 lumen LEDs to create
a vibrant, neon look. The tubes were then wrapped in
semi-transparent rubber than diffused the light to a soft
glow. One strip was stuck along the bottom
inside edge of the crate, to light up the skeleton, while
another pair of strips were stuck into each rubber ‘cable’
held by the zombie. |
|
|
|
|
|
|
|
|
|
|
|
|
|
|
|
|
|
|
|
|
|
|
|
|
|
|
|
|
|
|
|
|
|
|
|
|
|
|
|
|
|
|
|
|
|
|
|
|
|
|
|
|
|
|
|
|
|
|
|
|
|
|
|
|
|
|
|
|
|
|
|
|
|
|
|
|
|
|
|
|
|
|
|
|
|
|
|
| |
|
|
These LED strips
ran
from a 24V power supply, via DMX decoders that converted the
DMX signals from the controlling computer to voltage levels
to switch on the red, green and blue LEDs on the tape. Two
decoders were used, which meant the LED tape in the crate
was on a different DMX channel to that inside the
electrocuting cables, allowing them to be addressed and
controlled separately. It was surprising how quickly the
power consumption from these tapes went up! 5 metres of tape
was used in total. |
|
|
|
|
|
|
|
|
|
|
|
|
|
|
|
|
|
|
|
|
|
|
|
|
|
|
|
|
|
|
|
|
|
|
|
|
|
|
|
|
|
|
|
|
|
|
|
|
|
|
|
|
|
|
|
| |
|
|
 |
|
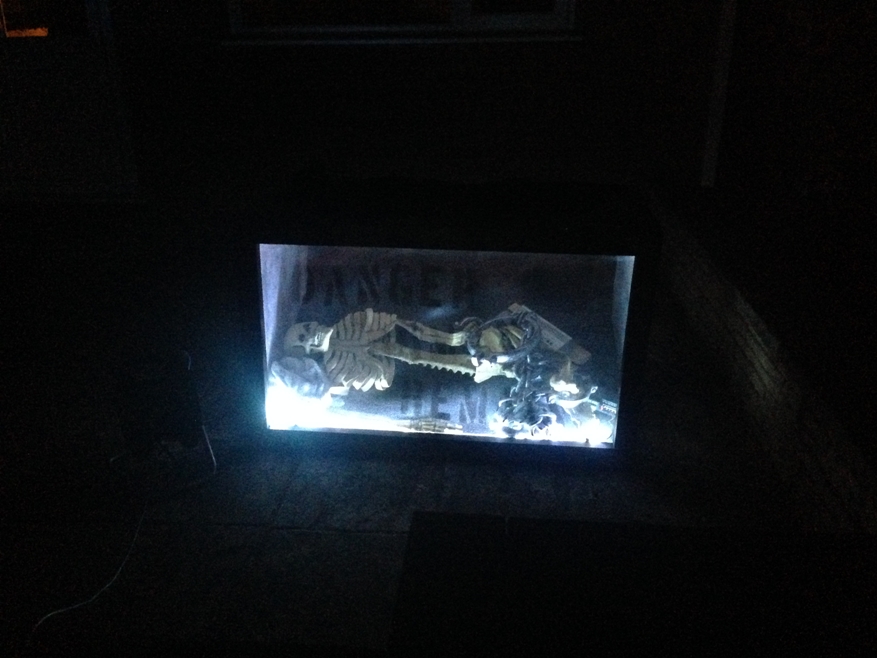
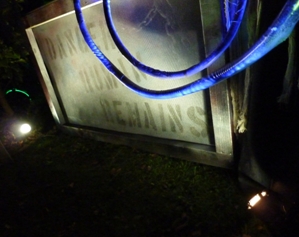
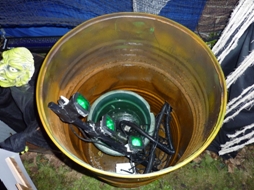
The trick with
the scrim was to illuminate the front of it as much as
possible all the time the skeleton was to remain unseen. So
two PAR 16s were added either side of the crate, with their
light grazing its surface to allow for the skeleton and
everything behind to fall into darkness, and also for the
lettering on the front to be seen clearly (see image above). At the
appropriate moment in the sequence, these lights would be
quickly switched off, allowing visitors to see the skeleton
through the scrim, lit up by the bright flashes from the LED
tape inside.
The sounds for this effect were created as a stereo
soundtrack. Ghoulish laughter and electrical buzzing played
from a speaker next to the zombie in front of the crate,
while loud zapping noises and the skeleton’s anguished
screaming came from another speaker positioned behind the
crate, giving a sense of direction to the sounds
as the effect unfolded. |
|
|
| |
|
|
|
 |
Watch the crate in action
with this clip
recorded on the night
(.mp4, 15.1mb) |
|
|
|
|
|
|
|
|
|
|
|
|
|
|
|
|
|
|
|
|
|
|
|
|
|
|
|
|
|
|
|
|
|
|
|
|
|
|
|
|
|
|
|
|
|
|
|
|
|
|
|
|
|
|
|
|
|
|
|
|
|
|
|
|
The Pop-up Zombie |
|
|
|
|
|
|
|
|
|
|
|
|
|
|
|
|
|
|
|
|
|
|
|
|
|
|
|
|
|
|
|
|
|
|
|
|
|
|
|
|
|
|
|
|
|
|
|
|
|
 |
|
|
|
|
|
|
|
|
|
|
|
|
|
|
|
|
|
|
|
|
|
|
|
|
|
|
|
| |
|
|
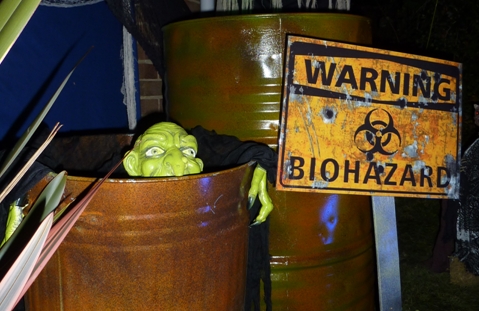
The animated axe
figures from 2013 had worked successfully and were popular
with visitors, so I was keen to re-use the workings of this
effect for a new feature; a zombie that would emerge
unexpectedly from a barrel in the toxic waste scene.
One of the figures would also be reused too: the
axe-swinging goblin himself, given a cunning green spray
paint for a more undead appearance!
This was to be another motion-activated effect, with a great
ghoulish laugh to accompany his sudden appearance! |
|
|
|
|
|
|
|
|
|
|
|
|
|
|
|
|
|
|
|
|
|
|
|
|
|
|
|
|
|
|
|
|
|
| |
|
|
Watch this clip
of the zombie during development, and in the display
(.mp4,
12.9mb) |
|
|
|
|
|
|
|
|
|
|
|
| |
|
|
|
|
|
|
|
|
|
|
|
|
|
|
|
|
|
|
|
|
|
|
|
|
|
|
|
|
|
|
|
|
|
|
|
|
|
|
|
|
|
|
|
|
|
|
|
|
|
|
|
|
| |
|
|
 |
|
|
|
|
|
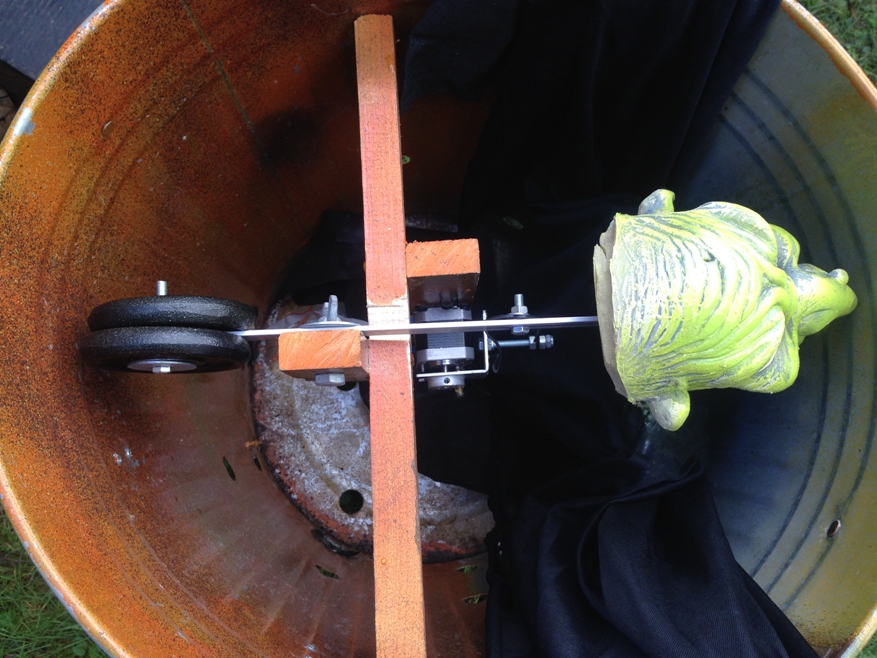
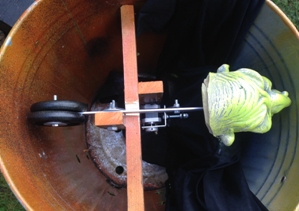
This new
animated prop was based around a seesaw-type assembly,
with the zombie figure at one end of a metal bar, a
counterweight at the other, and a stepper motor mounted in the
centre to move the figure up and down on cue.
The almost inevitable problem of the motor not having enough
torque to turn this much weight about a point was solved, in
the end, by mounting the bar on a pivot, and repositioning
the motor underneath the figure, such that it actually
pulled the zombie end of the bar downwards, held it under
tension, and then released it when triggered. This
configuration, while less ideal for the motor, had the added
bonus of giving much improved movement to the effect. The
counterweight was slightly heavier than the zombie; when the motor released
its hold, the weights accelerated the bar downwards causing
the figure to shoot up quite violently! |
|
|
|
|
|
|
|
|
|
|
|
|
|
|
|
|
|
|
|
|
|
|
|
|
|
|
|
|
|
|
|
|
|
|
|
|
|
|
|
|
|
|
|
|
|
|
|
|
|
|
|
|
|
|
|
|
|
| |
|
|
Adding some water
magic |
|
|
|
|
|
|
|
|
|
|
|
|
|
|
|
|
|
|
|
|
|
|
|
|
|
|
|
|
|
|
|
|
|
|
|
|
|
|
|
|
|
|
|
|
|
|
|
|
|
|
|
|
|
|
|
|
|
|
|
|
| |
|
|
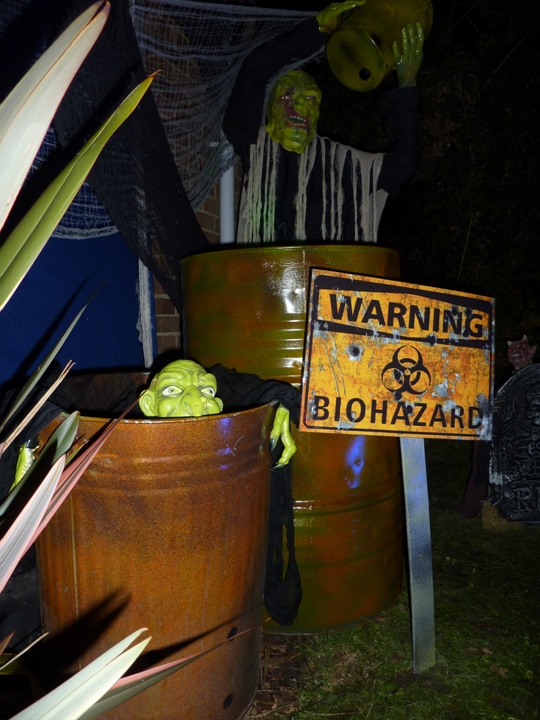
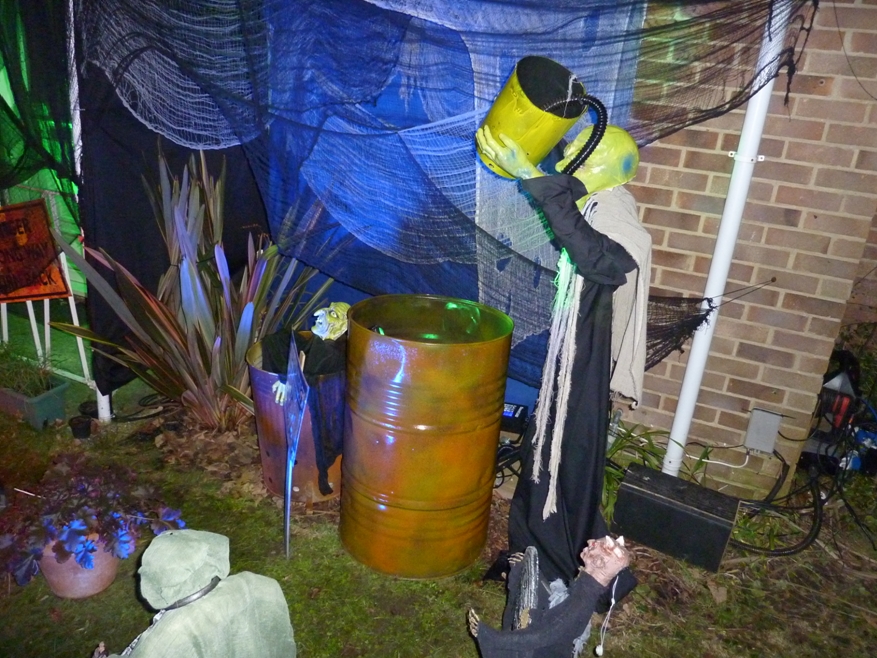
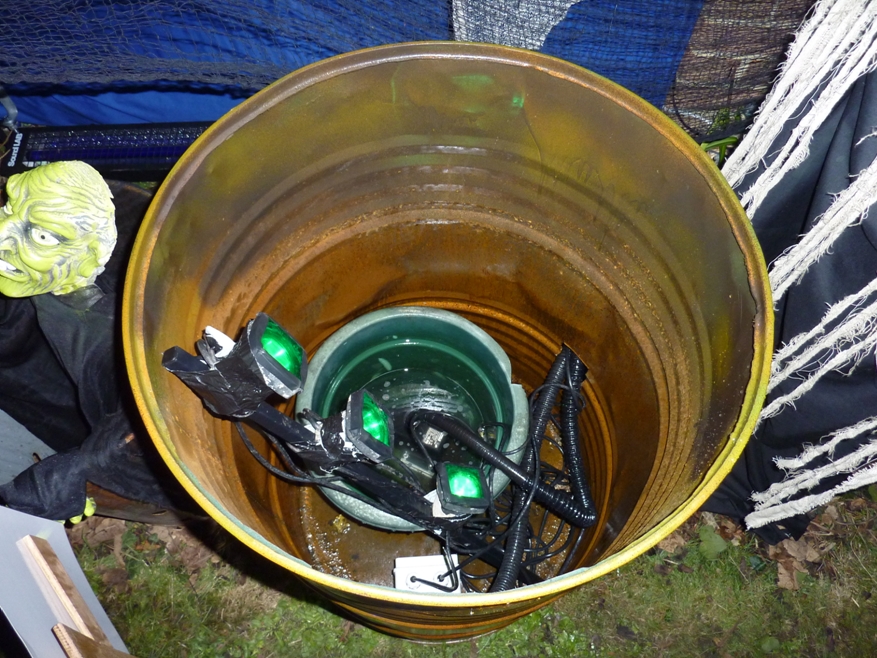
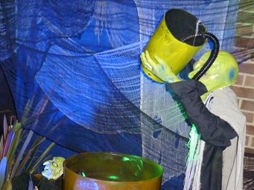
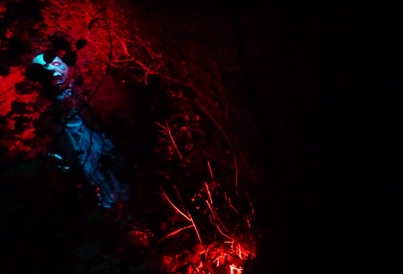
A nice little
touch to the toxic waste scene was the inclusion of a water
pump that allowed the large zombie holding a yellow bucket
to actually pour ‘toxic waste’ into his barrel as part of
the animated sequence. As he did this, thick smoke then rose
from the barrel, implying a powerful chemical reaction!
|
|
|
|
|
|
|
|
|
|
|
|
|
|
|
|
|
|
|
|
|
|
|
|
|
|
|
|
|
|
|
|
|
|
|
|
|
|
|
|
|
|
|
|
|
|
|
|
|
|
|
|
|
|
|
|
|
|
|
|
|
|
|
|
|
|
|
|
|
 |
|
|
|
|
 |
|
|
|
|
| |
|
|
In a similar way
to the witches scene of the previous year, a large pipe
connected to a hidden smoke machine was run into the base of
the barrel, and another pipe was threaded up the arm of the
zombie and into the yellow container.
A big container of water was positioned inside the barrel,
with some underwater lights to provide a safe way of
illuminating the falling water in a ghoulish green from below!
|
|
|
|
|
|
|
|
|
|
|
|
|
|
|
|
|
|
|
|
|
|
|
|
|
|
|
|
|
|
|
|
|
|
|
|
|
|
|
|
|
|
|
|
|
|
|
|
|
|
|
|
|
|
|
|
|
|
|
|
|
|
|
|
|
|
|
|
|
|
|
|
|
|
|
|
|
|
|
|
|
|
|
|
|
|
|
|
|
|
|
|
|
|
|
|
|
|
|
|
|
|
|
|
|
|
|
|
|
| |
|
|
Pepper's Ghost returns |
|
|
|
|
|
|
|
|
|
|
|
|
|
|
|
|
|
|
|
|
|
|
|
|
|
|
|
|
|
|
|
|
|
|
|
|
|
|
|
|
|
|
|
|
|
|
|
|
|
|
|
|
|
|
|
|
|
|
|
| |
|
|
I loved
developing this effect in 2013, and remember being really
chuffed at how effective it looked the very first
time I tried it out.
So it had to return for 2014!
|
|
|
|
|
|
|
|
|
|
|
|
|
|
|
|
|
|
|
|
|
|
|
|
|
|
|
|
|
|
|
|
|
|
|
|
|
|
|
|
|
|
|
|
|
|
|
|
|
|
|
|
|
|
|
|
|
|
|
|
|
|
|
|
 |
|
|
|
|
|
|
|
|
|
|
|
|
|
|
|
|
|
|
|
|
|
|
|
|
|
|
|
|
| |
|
|
|
|
I found a great
full-size zombie figure for this year's Pepper’s Ghost effect. It
had highly detailed features and clothing, and the resulting
reflection in the Perspex screen looked positively
holographic!
In fact, during the evening I overheard one visitor say to her
friends “Oh look! They’ve got a hologram!” - if only
the budget stretched to a proper one…!
For a more detailed demonstration as to how this effect
works, see the page describing the effects for the
2013 display.
|
|
|
|
|
|
|
|
|
|
|
|
|
|
|
|
|
|
|
|
|
|
|
|
|
|
|
|
|
|
|
|
|
|
|
|
| |
|
|
|
|
|
Take a look at the ghost in action
with this clip
(.mp4, 11.4mb) |
|
|
|
|
|
|
|
|
|
|
|
|
|
|
|
|
|
|
|
|
|
|
|
|
|
|
|
|
|
|
|
|
|
|
|
|
|
|
|
|
|
|
|
|
|
|
|
|
|
|
|
|
|
|
|
|
|
|
|
|
|
|
|
|
|
|
|
|
|
|
|
|
|
|
|
|
|
|
|
|
|
|
|
|
|
|
|
|
|
|
|
|
|
|
|
The Wraith |
|
|
|
|
|
|
|
|
|
|
|
|
|
|
|
|
|
|
|
|
|
|
|
|
|
|
|
|
|
|
|
|
|
|
|
|
|
 |
|
|
|
|
|
|
|
|
|
|
|
|
|
|
|
|
|
|
|
|
|
|
|
|
|
|
|
|
|
| |
|
|
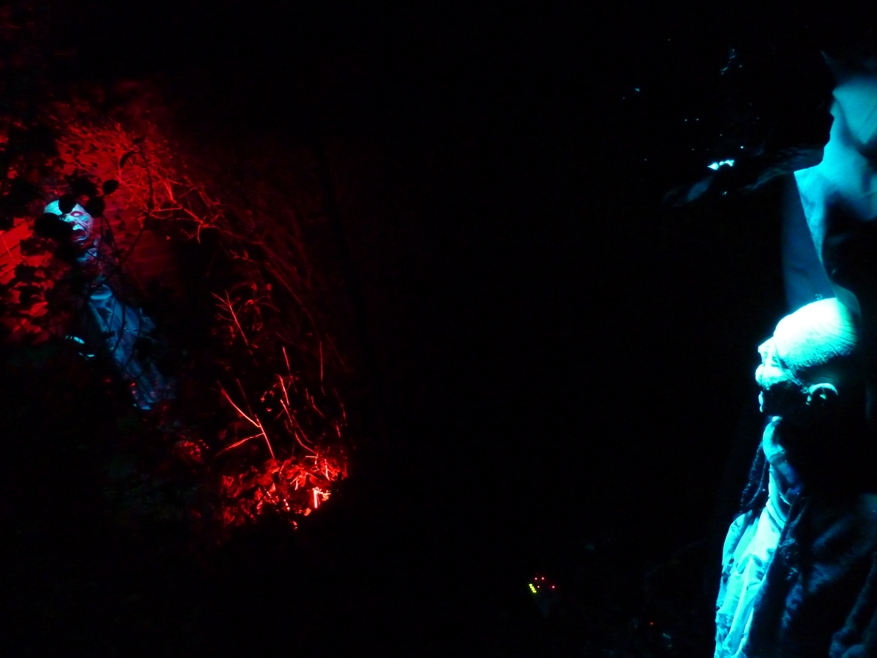
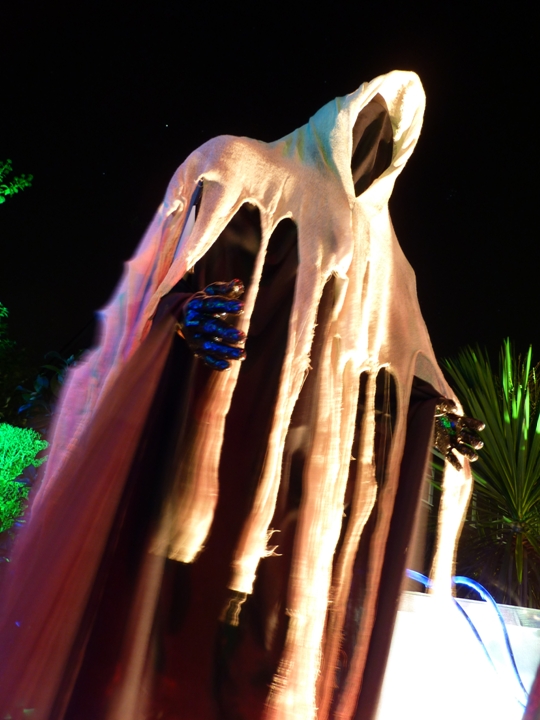
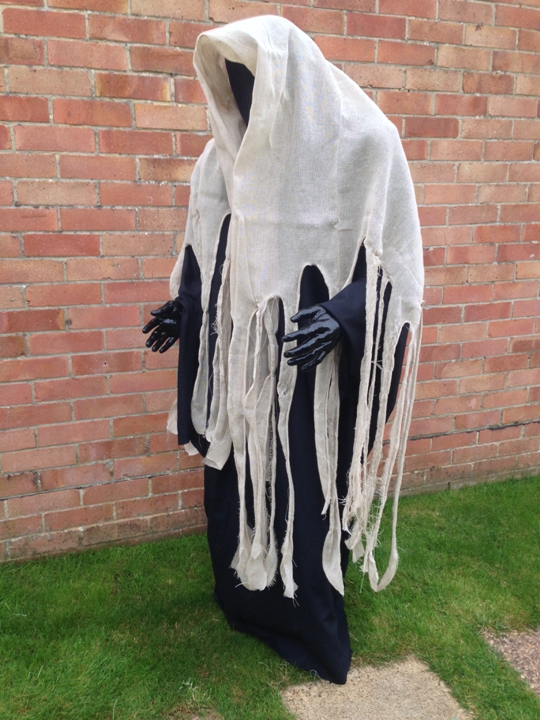
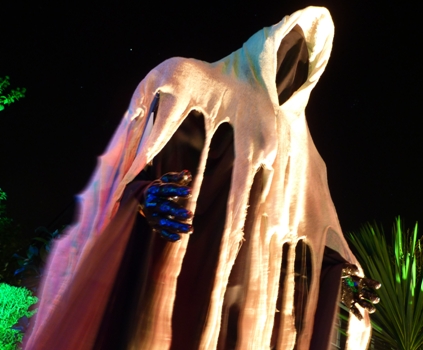
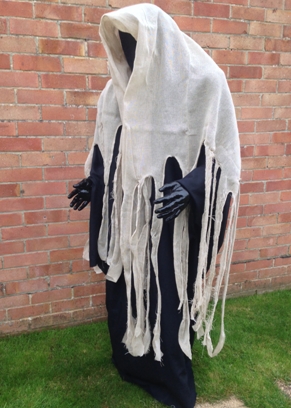
The wraith was a
later addition to the display, perhaps not in keeping with
the rest of the theme, but I just loved its creepy
appearance and thought it had to go in!
While doing the research into Alton Towers’ Haunted House,
I found some promotional material for their rollercoaster TH13TEEN. As part of the theming for this ride, a number
of costumed actors known as ‘wraiths’ are known to wander
the queue lines of the attraction, spooking visitors. I
thought their faceless appearance was really creepy, and
decided that I could build a similar figure to scare our
visitors.
Shortly afterwards, I found an old lighting effect (and I
mean old!) known as a PAR 36 scanner – basically a 30W beam
of light that scanned left to right through about 90
degrees, slowly and repeatedly. This gave me an idea. On
taking it apart, it had a very hefty motor that could handle
turning a lot of weight…perhaps the wraith figure I was
about to build could be mounted onto this...
|
|
|
|
|
|
|
|
|
|
|
|
|
|
|
|
|
|
|
|
|
|
|
|
|
|
|
|
|
|
|
|
|
|
|
|
|
|
|
|
|
|
|
|
|
|
|
|
|
|
|
|
|
|
|
|
|
|
|
|
|
|
|
|
|
|
|
|
|
|
|
|
|
|
|
|
|
|
|
|
|
|
|
|
|
|
|
|
|
|
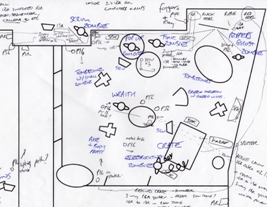
|
|
|
|
|
|
|
 |
|
|
|
|
|
|
|
|
|
|
|
|
|
|
|
|
|
|
|
|
|
|
|
|
|
|
|
|
|
|
|
|
|
|
|
|
|
|
|
|
|
|
|
|
| |
|
|
|
|
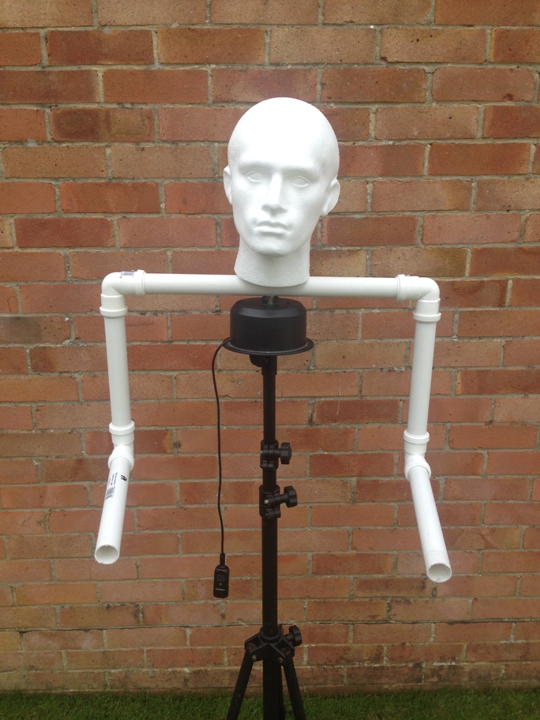
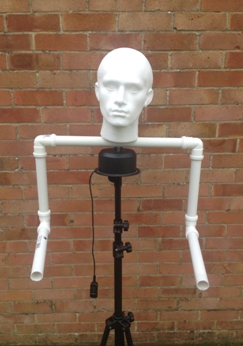
This seemed a
good way of adding movement. The
figure was, like the zombies, mounted on a lighting stand
for ease of adjustment, however this time the big motor
pilfered from the PAR 36 scanner was attached to the stand,
and the actual framework for the figure (made this time from
lightweight PVC pipe, see the photo opposite) was bolted to
the motor spindle.
I decided to make it more challenging by adding the
requirement that the figure should initially face away from
the path. Then, when triggered by a visitor, slowly turn
towards them, pause for a few seconds, then turn back to its
original starting point, ready for the next trigger. This
was no problem for a little Arduino Uno microcontroller,
hidden away underneath the figure, which handled all the
stopping and starting of the motor, including working out
where the figure was currently pointing in order to know
when to stop turning it. These Arduino boards would later go
on to be used in future Halloween shows to
control a new 'generation' of figures...more about that in
the next pages!
As the effect turned out, I’d overlooked one important
element – actually triggering the movement in the first
place! I’d already filled the garden with the crate and the toxic zombie
scene, and it was difficult to know where and when the
wraith should be triggered. I wasn’t keen on installing yet
another PIR sensor (I already had three sensors covering
about four metres of path!) so in the end it was tacked onto
the crate sequence, triggering directly after the zombie had
done his thing with the electrodes and skeleton.
|
|
|
|
|
|
|
|
|
|
|
|
|
|
|
|
|
|
| |
|
|
|
|
|
|
|
|
|
|
|
|
|
|
|
|
|
|
|
|
|
|
|
|
|
|
|
|
|
|
|
|
|
|
|
|
|
|
|
|
|
|
|
|
|
|
|
|
|
|
|
|
| |
|
|
The only problem
here was that there wasn’t really a good way of triggering
this completely standalone effect, given that the whole
crate was a full-on DMX controlled affair, and the wraith
most certainly wasn’t!
So in the end it was triggered via a dimmer channel turning
on a 12V transformer, which in turn would cause the Arduino
board to begin its motor turning sequence. A bit dodgy,
and it lead to some slightly unpredictable behaviour, but it
did the job!
The wraith looked brilliant at night, and like the other
figures it was a full
size thing, at least 5ft tall. During the evening it caught
several people off guard as they walked by!
I deliberately programmed for it to start turning just
slightly before the crate effect finished, such that the
visitors would be distracted looking elsewhere, and then
when they moved further up the path, this sinister hooded
figure would be already moving slowly in their direction! |
|
|
|
|
 |
|
|
|
| |
|
|
|
|
|
|
|
|
|
|
|
|
|
|
|
|
|
|
|
|
|
|
|
|
|
|
|
|
|
|
|
|
|
|
|
|
|
| |
|
Watch the wraith being tested.
The first part shows the figure before the control system
was built - it turns continuously.
(.mp4, 8.3mb) |
|
|
|
|
|
|
|
|
|
|
|
|
|
|
|
|
|
|
|
|
|
|
|
|
|
|
|
|
|
|
|
|
|
|
|
|
|
|
|
|
|
|
|
| |
|
|
|
|
|
|
|
|
|
|
|
|
|
|
|
|
|
|
|
|
|
|
|
|
|
|
|
|
|
|
|
|
|
|
|
|
|
|
|
|
|
|
|
|
|
|
|
|
|
|
|
|
|
|
|
|
|
|
|
|
|
|
|
|
|
|
|
|
|
|
|
|
|
|
|
|
|
|
|
|
|
|
|
|
|
|
|
|
|
|
| |
|
|
|
Zombie in the Porch |
|
|
|
|
|
|
|
|
|
|
|
|
|
|
|
|
|
|
|
|
|
|
|
|
|
|
|
|
|
|
|
|
|
|
|
|
|
|
|
|
|
|
|
|
|
|
|
|
|
|
|
|
|
|
|
|
|
| |
|
|
|
 |
|
|
|
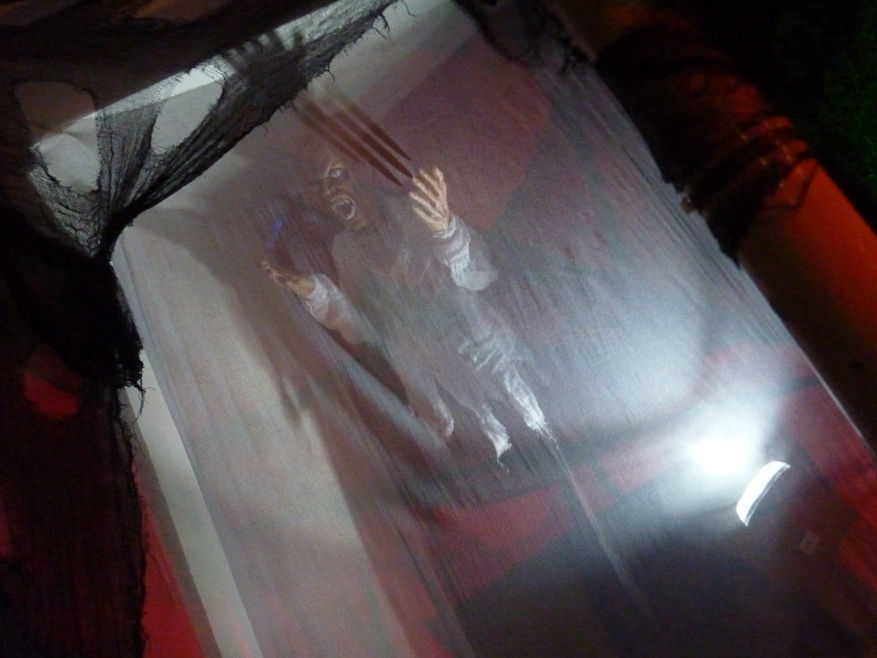
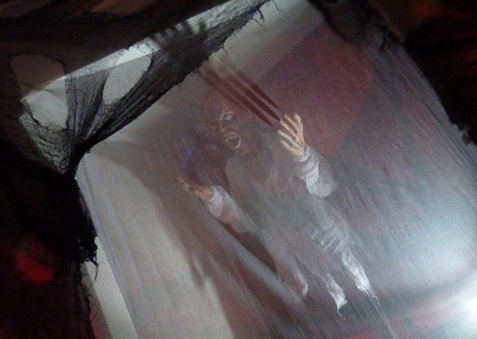
The final shock
effect, located in the porch and activated when visitors
stepped underneath, was to use the same basic idea as the
previous year, so it was time for more scrim!
A big piece of the shark-tooth material was cut out and
stretched floor to ceiling in the far corner of the porch.
Behind this, a fairly gruesome-looking zombie with bulging
eyes was positioned. When a visitor came near, the lights in
the porch would go out, and the zombie would be lit up
behind the scrim with some strobe light flashes, accompanied
by a loud, tortured scream!
This was one of my favourite effects; very simple, but it
made a lot of people jump! |
|
|
|
| |
|
|
|
|
|
|
|
|
|
|
|
|
|
|
|
|
|
|
|
|
|
|
|
|
|
|
| |
|
|
|
|
|
|
|
Watch our zombie make visitors jump
with this great clip from the night
(.mp4, 21.2mb) |
|
|
|
|
|
| |
|
|
|
|
|
|
|
|
|
|
|
|
|
|
|
|
|
|
|
|
|
|
|
|
|
|
|
|
|
|
|
|
|
|
|
|
|
|
|
|
|
|
|
|
|
|
|
|
|
|
|
|
| |
|
|
|
|
Unleashing the un-dead for
2014... |
|
|
|
|
|
|
|
|
|
|
|
|
|
|
|
|
|
|
|
|
|
|
|
|
|
|
|
|
|
|
|
|
|
|
|
|
|
|
|
|
|
|
|
|
|
|
|
|
|
|
|
|
|
|
|
|
|
| |
|
|
|
|
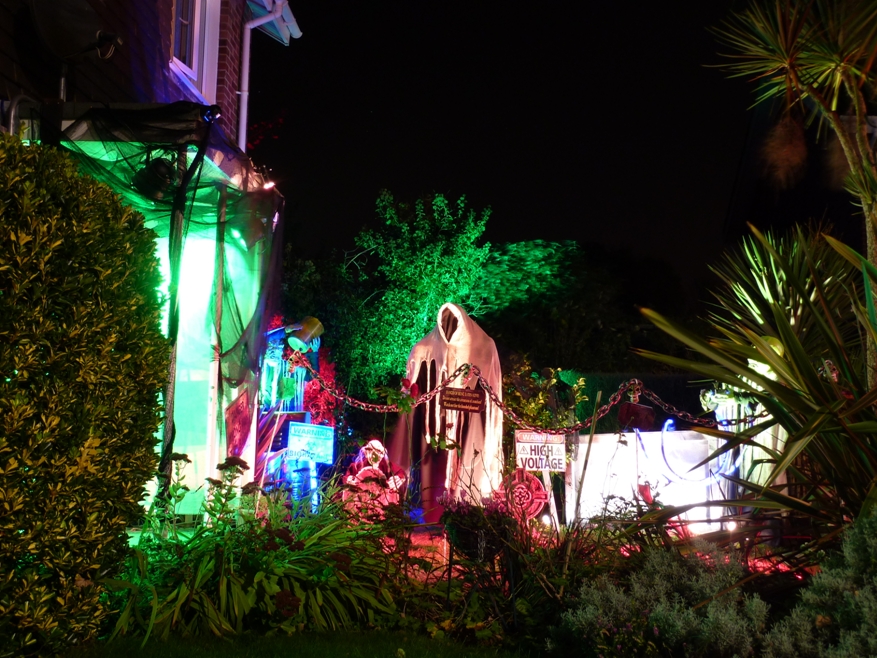
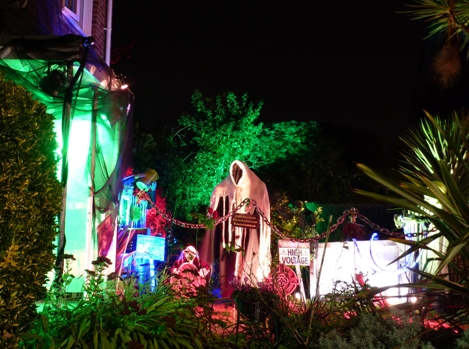
The Halloween
Experience opened for business at 5.30pm on
October 31st 2014.
By the time of completion, it was the biggest display I had
designed for Halloween. It turned out to be very popular, with
lots of people visiting thanks to the weather being very
nice to us! It was noticeably scarier for some, with several
younger visitors needing considerable persuasion to venture
down the path! I’d had a lot of fun designing and building
all the props and figures – much bigger than previous years
- and it was quite special to see them working for real in
front of me!
This image to the right shows the whole display. You
can see all the effects operating in the video clip below. |
|
|
|
|
 |
|
|
|
|
|
|
|
|
|
|
|
|
|
|
|
|
|
|
|
|
|
|
|
|
|
|
| |
|
|
See
all the effects plus a full walkthrough
of
the 2014 display with this clip
(.mp4,
33.5mb) |
|
|
|
|
|
|
|
|
| |
|
|
|
|
|
|
|
|
|
|
|
|
|
|
|
|
|
|
|
|
|
|
|
|
|
|
|
|
|
|
|
|
|
|
|
|
|
|
|
|
|
|
|
|
|
|
|
|
|
|
|
|
| |
|
|
|
|
And so that was
it! It's always a strange feeling at the end of the night
when it's all come to an end; sad in its own way that it's
over for another year. But with a tenth year display all
done and dusted, I was undecided as to what to do next:
finish the experiences on this high note, or start thinking
about how it could be topped for next year?
I think
you can probably guess what I chose to do...! |
|
|
|
|
|
|
|
|
|
|
|
|
|
|
|
|
|
|
|
|
|
|
|
|
|
|
|
|
|
|
|
|
|
|
|
|
|
|
|
|
|
|
|
|
|
|
|
|
|
|
|
|
|
|
| |
 |
|
|
|
|
|
|
|
|
|
|
|
|
|
|
|
|
|
|
|
|
|
|
|
|
|
|
|
|
|
|
|
|
|
|
|
|
 |
|
|
|
|
|
|
|
|
|
|
|
|
|
|
|
|
|
|
|
|
|
|
|
|
|
|
|
|
|
|
|
|
|
|
|
|
|
|
|
|
|
|
|
|
|
|
|
|
|
|
|
|
|
|
|
|